The Tables Panel
In relational databases and flat file databases, a table is a set of data elements (values) that is organized using a model of vertical columns (which are identified by their name) and horizontal rows. A table has a specified number of columns, but can have any number of rows. Each row is identified by the values appearing in a particular column subset which has been identified as a candidate key.
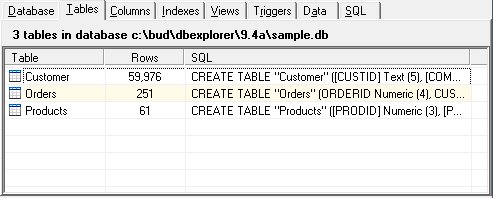
The tables panel show all tables currently defined in the database. The table name, number of rows, and the SQL that created the table are displayed. Tables may be selected for editing or deletion.
The DBExplorer uses a concept of the "Currently Selected Table" or the "Currently Selected View". With this concept, the selection of a particular table or view controls what columns, indexes, triggers, and data is displayed on the other tab pages. To view the columns of the Products table, first select the table by clicking the appropriate row in the list or by clicking the Products table in the tree display. Switching to the columns panel will now show the columns in the Products table. The Indexes and Data panels behave in the same manner.
Table Addition
To add a table to the database, select "Add" from the Table menu or right click on the Tables panel and choose "Add". The Table Editor will then be displayed.
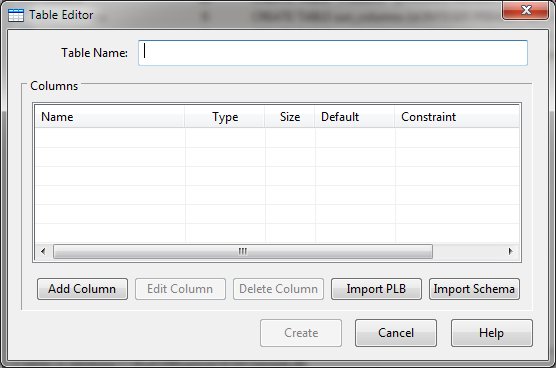
Typically, enter a table name and click to the "Add Column" to invoke the column editor and define the columns required in the table.
You may add as many columns as needed. Once all columns have been defined, click the "Close" button to return to the table editor.
If you have PL/B source statements that define the columns, you may use another method to quickly define the table's columns. Clicking the "Import PLB" button presents a dialog as follows:
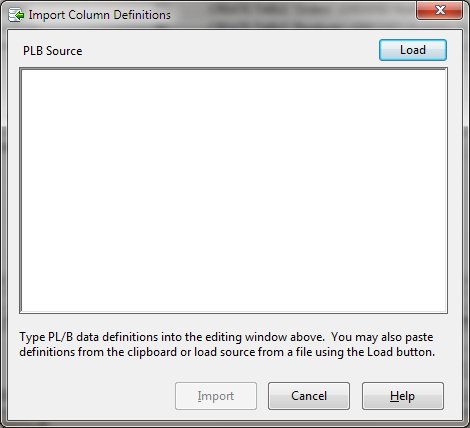
You can type PLB data definition statements (Dims, Forms, Integers, and Inits) into the edit window. Alternatively, you can paste copied source statements into the window. Finally, you can click the "Load" button and select a file containing source statements. Once the statements are in the source window, click "Import" to convert the data definitions to column definitions.
Another alternative for defining columns is to import the definitions from a schema file defined for use with Sunbelt ODBC product. By clicking "Import Schema" from the table editor, you may select the desired schema file and the following dialog is displayed:
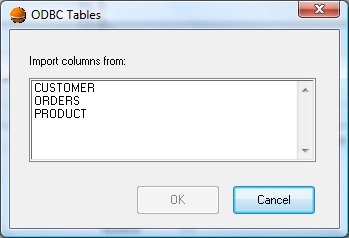
After selecting the table as defined in the schema file, the columns will be added to table definition.
After columns have been defined, the Table Editor allows columns to be edited and deleted before the table is actually created. Once the table name and at least one column have been defined, click "Create" to make the table.
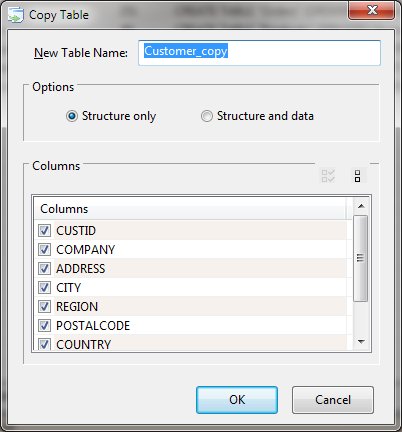
Table Copy
Tables may copied into a new table. When the copy function is selected from a menu, the Table Copy dialog will appear.
A proposed new name consisting of the original table's name with the "_copy" suffix is added. The user may also select whether just the table's structure or the structure and data is to be copied. Finally, columns may be excluded or included from the process.
Table Rename
The Rename table function allows the user to alter a table's name. Any existing table indexes will be updated but the user will need to modify any associated triggers.
Table Delete
The Delete table function removes the table, any indexes and triggers, and all data within the table from the database. The Delete functions within the DBExplorer utility all support multiple selection.


 |